INDEX :
II. Minimum & Recommended requierements for audio
III. Storage, backups and security
IV. Audio plugins formats & installation/management tips
VI. Datas Transfer Speed (Gook to know)
I. Computer main components
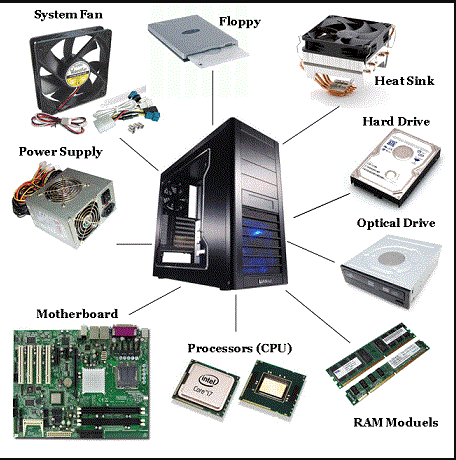
Every computer needs the following components to work properly :
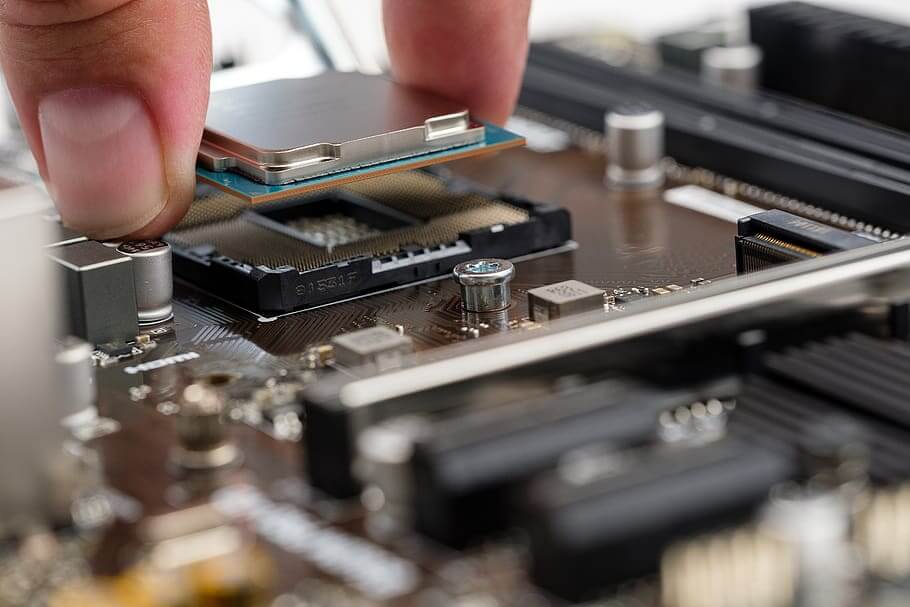
- CPU – The processor wich make the calculs
- Motherboard – The main piece that glue and transfer data between all components
- GPU (may be optionnal) Graphic processor
- RAM memory – To store live/dynamic datas used by the programs running
- ROM memory – To store your file & datas (all types)
- Power Supply – To power everything (beware of not over/under powering)
- Fans/Water cooling – To control the temperature inside of the computer
You may find the following in addition :
– WIFI pci express card Allows to connect to WIFI
– CD/DVD player – PCI express devices
– Additional GPU in SLI bridge (Won’t be needed in Audio)
– More fans
We find 2 types of architectures :
Open – which means you can upgrade/repair/customize easily your computer’s hardware e.g.: most of PC desktops (especially custom built or gamer)
Pros : Choose your components, upgrade in time, spend less money overall. Cons : Campatibility issues when lack of knowledges, Oftenly takes some place.
Closed – which means you can’t access the components inside e.g.: Apple’s laptops/Newest Imacs
Pros : Pre-optimised for compatibility (not performances ! ), Mobile. Cons : Cost more, less possibility of upgrade and optimisation of the specs.
Once the hardware is in place and properly connected, the motherboard which handles the differents I/Os and there routing -besides other things- will allow you to enter the BIOS once the computer is booted up.
BIOS stands for Basic Inputs/Outputs System, it allows you to modify some of the motherboard’s settings, like choosing from which drive it should boot up (something you’ll need to do to install your OS if you selfbuild a machine.
The OS, as you may know, is the Operating System (Windows, Mac OS, Linux…) It allows you, the user to communicate “easily” with your computer components via differents native & third party applications (softwares)
II. Minimum & Recommended requierements for audio
– CPU : At least with 3GHz of speed and quad core. Faster is better.
–
Motherboard You want one
which supports thunderbolt or USB-C and have a comaptible socket with
your CPU.
–
GPU : Depending on
your needs and budget from GTX 1050/1060 to high end NVIDIA cards.
– RAM memory Minimum : 8Gb ddr4 3600mHz // Recommended : 16Gb ddr4 3600 mHz // Heavy work: 32Gb ddr4 3600mHz
–
ROM memory Minimum : 500Gb SSD
+ external storage // Recommend 500Gb SSD for OS & Softwares +
500Gb SSD for Audio Softwares & Plugins + 1Tb SSHD for data &
files // You can lot more disks in a custom desktop just make sure
you install OS and Audio Softwares on SSD drives to avoid latency and
loading times.
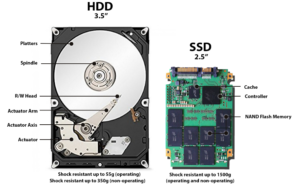
HDD
vs. SSD ? | RAID
Storage
–
Power Supply Should be adapted
to your configuration, for a recommended config, it should be around
650w / 750w, make sure it is certified Gold or Platinum at least.
You may also want to check the ones that makes less noise (like
BeQuiet products)
–
Fans/Water A few should be included in your case you’ll need at
least a dedicated one in addition for the CPU.
– WIFI pci express card They don’t cost much and are easy to plug.
– CD/DVD player Following your needs, you can also have a USB external one. You won’t need it for installs aymore.
Example of recommended config. :
CPU
: Intel
I7 8700k
3,7GHz speed / 6 core / socket LGA 1151
Motherboard
: Asus Prime Z370-A (compatible socket LGA 1151, support USB-C)
RAM
: 16Gb ddr4 3600mHz
ROM : 500Gb SSD (OS) / 500Gb SSD (Audio) /
1Tb SSHD (Storage) + external Hard Drive & Cloud backups
Power
Supply : 750w BeQUiet Dark Power Pro 11
Fans : BeQuiet Dark Rock
Pro 4
Wifi Card : TP-LINK TL-WDN4800 450Mbps
Keep in mind that the weakest piece in your rig usually represents the overall level of the rig.
OS Optimization :
Optimize Windows 10 for audio production
Optimize Windows 7 for audio production
Optimize Mac OS various versions or other windows versions for audio production
Note : For OS optimization feel free to leave aside some steps if you feel they are useless for you or not justified.
III. Storage, backups and security
You’ll never have enough backups, you never know when your drive might crash, be stolen, destroyed or anything.
I highly recommend having at least :
– An external drive for Backups only (SSD or HDD 7200rpm USB 3/USB-C or Thunderbolt recommended)
– A dedicated server or cloud Storage you can access remotely from any computer (encrypted storage & transfer are recommended).
You should do some backups of your important files, sessions, datas at least once a month, (once by week or everyday following your activity are always better, some synchronized & automatic backups tools are available for the lazy ones.
I
would also recommend creating an encrypted file within a password
protected drive or folder in which you may backup all your Audio
accounts (login username/password) + all your Audio Licenses.
In
this way if you really lost a password or if you need to reactive
your products on an other computer you won’t have to go reach every
licenses on your manufacturers websites, if they have an issue,
you’ll still have all your licenses backed up etc… It might really
help at some point.
When you are working on important projects, i would recommended backing it up at least in one or two place each time you update it.
When about to update your computer or softwares, you should make a global backup first, to be able to restore this state if anything goes wrong.
Drive Formats
Compatible Windows & Mac : exFAT / FAT 32 (Legacy)
Compatible Windows only : NTFS (NT File System) / FAT 32 (Legacy)
Compatible Mac only : HFSX & HFS+ / HFS (Legacy)
IV. Audio plugins formats & installation/management tips
A
plugin is a “little” software that must be runned within an
other software.
However some plugins are available in Standalone
mode.
There
is 3 main formats of Audio Plugins :
.VST
(VST2, VST3)
Format developped by Steinberg, open source,
it’s the most common format (and accepted by most daws) for audio
plugins.
.AAX
Format developped by Avid (Pro Tools), proprietary, you need to may to be able to release a .aax, it will work only on Avid softwares.
.AU
Format developped by Core Audio only in Apple’s Mac OS and IOS systems.
Best
thing is to have a custom folder for your Audio Plugins.
You’ll
install all your plugins in this folder.
You may create the
folder just under the root of your audio drive.
For example,
my audio drive is drive ” E: ”
Where i have a folder
“Plugins” with 2 subfolder “64bit” / “32bit”
.
In those i’ll create one folder by Plugins Manufacturer,
and install :
– 64 bit requiered format(s) plugin at
“E:\Plugins\64bit\ManufacturerName”
– 32bit
requiered format(s) plugin at “E:\Plugins\32bit\ManufacturerName”
By
following this routine, every plugins will show up properly in a
Manufacturer’s list in your DAWs. You might need to specify the
path to your custom plugins folder in your DAW preferences/settings.
Most of the plugins will allow you to download a .exe (or .dmg on Mac) which will install for you the plugin’s file usually a .dll + eventual data’s stored in a folder.
The installer should let you specify the installation path.
In some case you’ll directly download just a .dll file or a package with .dll file and a data folder. You may copy/paste them directly to your plugin folder and reload your audio application to see them.
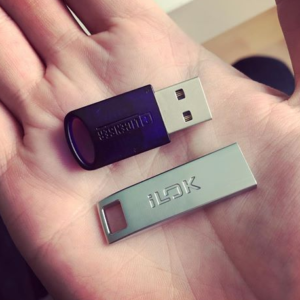
Some DAWs as well as some plugins requires a license to work, the license may be either a one time activation code to enter or for some, a USB dongle that needs to remain plugged in in order to use the applications.
There
is 2 main USB license dongle systems :
Ilok : Used
by Protools (Avid) and some plugins ( a cloud version of Ilok without
dongle needed is
also
available but not every products will allow the cloud version, some
accepts only the USB dongle)
Elicenser : Used
by Cubase (Steinberg)
V. Audio Interface
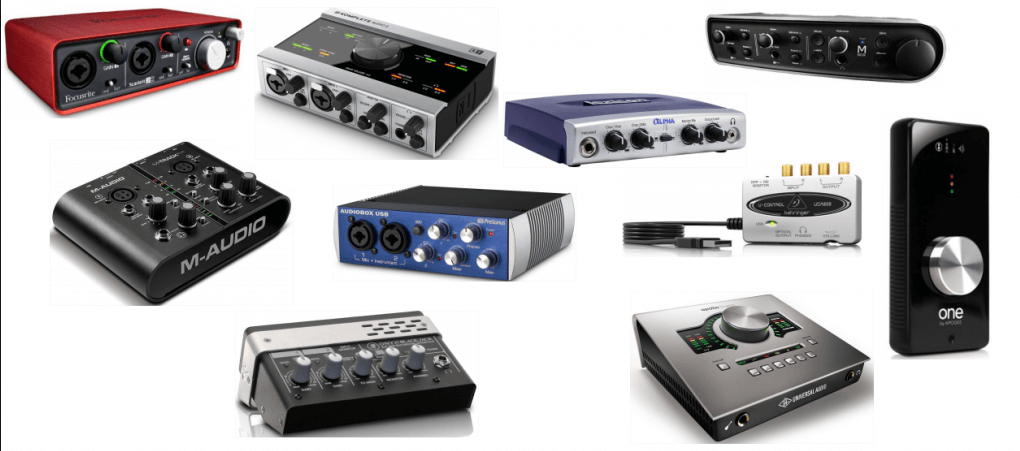
The
Audio interface allows the computer to handle Send & Received
audio signals via A/D – analog to digital- conversions (and
sometimes other protocols such as MIDI).
It might be internal,
connected via PCIexpress or External connected via USB, Thunderbolt
or FireWire.
You should consider mainly :
– The number
of I/Os (Inputs/Outputs), taking mono/stereo in to consideration.
If
you don’t record anything or just one/2 mic you can go with the 2×2
or 2×4 models.
While if you are more into acoustic/analog
instruments you might need more inputs to record all your sources at
the same time.
– The quality of the preamps for recording
(benchmark, check some reviews, try it if you can)
–
The sample rate(s) it can work with (following your needs)
What
is sample rate ?
– The presence of MIDI i/o, USB hub, or other usefull functions
–
The connectivity mode to make sure it is compatible and fast (USB C
or Thunderbolt would be more futur proof)
– The amount of THD (Total Harmonic Distortion) it may have when recording/playing back
loud.
–
The dynamic range of the inputs at recording
Basically
the range between loudest and lowest levels which the microphone can
handle. This is not only a function of the microphone but also of the
preamplifier from your audio interface used with the microphone.
VI. Data Transfer Speed (Good to know )
USB
1.0
– 11Mb/s
2.0 – 480Mb/s
3.0 – 5Gb/s
3.1
– 10Gb/s
USB-C – 10Gb/s + USB power + Display Port A/V
FireWire (Legacy)
400 – 400 Mb/s
800 – 800 Mb/s
Thunderbolt
1 – 10Gb/s
2 – 20Gb/s
3 – 40Gb/s